Student Attribute Manager Help Documentation
The Student Attribute Manager (SAM) allows partner units to provide supplementary cohort data to the Teaching & Learning Analytics data set, and eventually (and optionally) directly to the Student Data Warehouse. Data uploaded to SAM is combined with the student demographic and academic data that powers TLA reports and is made available to partner units via the SAM Analytics Tool.
Getting started with SAM
As of 9/24/2024, SAM is used by the following units:
- California Alliance for Minority Participation (CAMP)
- Student Outreach & Retention Center (SOAR)
- LIFTED
- Office of Civic Engagement
If you are in one of these units and need access to SAM: submit a TLA Access Request Form.
If you are not in one of these units and want to discuss onboarding to SAM, please contact us and we'll set up a time to chat and get you onboarded.
How-To: Access the SAM Analytics Tool
The link to the SAM Analytics Tool is available from the Insights homepage at any time:https://insights.compass.uci.edu/.
How-To: Create an attribute
Process
Note that none of this can be changed after you create your attribute, so please double check for typos and correctness before creating your attribute.
- Press the "Add Attribute" button
- Fill out the form:
- Provide a short but descriptive name
- Enter a helpful description
- Choose the appropriate attribute type (see below for more information)
- Press the "Create Attribute" button
That's it! Once you create the attribute, you can click on it to view more information or start uploading student lists.
Attribute Types
The Student Attribute Manager supports four different types of attributes:
- General
- Academic Year
- Academic Term (Quarter)
- Academic Probation: Only available to Compass TLA staff to create; if you need to create an academic probation attribute, please contact us.
The attribute type cannot be changed after creating the attribute, so please carefully review this information. If you have any questions, please contact us and we'll be happy to help you out.
How-To: Upload Data
Files must be converted to a CSV file before being uploaded to the Student Attribute Manager. Excel files (.xlsx or .xls) are not supported directly but can be converted to a .csv file first. Note that SAM data only goes back ~10 years, so files containing students who graduated before 2012 may not upload those students.
Process
- Navigate into the attribute to which you want to upload students
- Press the "Choose File" button and locate your CSV file (if it is an Excel file, it needs to be converted first)
- If your student ID # and (if needed) term or academic year column are not columns A and B respectively, then choose the appropriate columns below
- Press the "Upload File & Update Records" button and follow any subsequent steps that might appear
If you are uploading files containing many students, it can take a while to process; please be patient, but email us if it takes a really long time or errors out.
How to format terms in your uploads
If you are uploading data to a term-based attribute, the term name will need to be formatted as follows to successfully upload:
| Term | Format | Alternative Format |
|---|---|---|
| Fall | Fall 2023 | F-2023 |
| Winter | Winter 2023 | W-2023 |
| Spring | Spring 2023 | S-2023 |
| Summer 1 | Summer 1 2023 | Y-2023 |
| Summer 2 | Summer 2 2023 | Z-2023 |
| Summer 10 Week | Summer 10-Week 2023 | M-2023 |
The Student Attribute Manager maps terms to the Registrar terms; please note that there is no generic "Summer" term. If you have a summer program or attribute that you're tracking that doesn't tie to one of those terms, consider using the Summer 10-Week entry.
How to format academic years in your uploads
If you are uploading data to an academic-year-based attribute, please format it as follows (the example is for the 2023/24 academic year):
- 2023/24
- 23/24
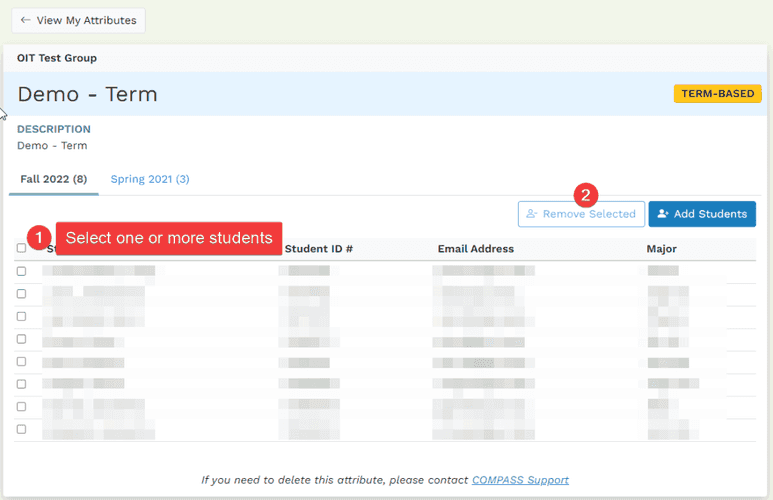
How-To: Remove students
Students can be removed from an attribute at any time. If a student is removed, they can be readded at any point in the future.
Process

- Navigate into the attribute to which you want to upload students
- Select one or more students
- Press the "Remove Selected" button
- Follow any subsequent directions
